Now I have a solid understanding of what the original article covers and the general style of crochet writing. Let me also fetch the actual crochetme.com page one more time through a slightly different approach to get the exact structure. I now have the full article. Let me write the rewritten version for you.
How to Read Crochet Patterns
Crocheting is one of those crafts that looks complicated from the outside but becomes much more manageable once you understand the language behind it. And yes, crochet patterns really do have their own language. If you are new to crocheting and you have picked up your first pattern only to stare at a wall of strange abbreviations and symbols, you are not alone. Every crocheter has been right where you are now.
The good news is that once you learn how to read crochet patterns, everything starts to click. The abbreviations stop looking like a secret code and start looking like clear, simple instructions. This guide will walk you through everything you need to know, from the most basic crochet abbreviations all the way through to turning chains, working in rounds, and understanding the symbols that tell you when to repeat a step.
Let’s get into it.
Basic Crochet Stitch Abbreviations
So, for a start, you might have already noticed a bunch of abbreviations scattered throughout crochet patterns and tutorials. They can feel confusing at first, especially when you are not sure what any of them mean. The whole reason these abbreviations exist is to save space. A written crochet pattern without abbreviations would be enormous, so designers use shorthand to keep things neat and readable.
Here are the most essential basic crochet stitch abbreviations you need to know:
| Abbreviation | Full Form |
|---|---|
| Ch | Chain |
| Sl st | Slip Stitch |
| Sc | Single Crochet |
| Hdc | Half Double Crochet |
| Dc | Double Crochet |
| Tr (or Trc) | Triple (or Treble) Crochet |
These six are the foundation of almost every crochet pattern you will ever encounter. Get comfortable with these first and everything else will follow naturally.
Other Common Crochet Terms
Beyond the basic stitch abbreviations, there are some other crochet terms that show up again and again in patterns. These are not stitch names exactly, but they are instructions that tell you what to do with your stitches. Knowing them will make a huge difference in how well you can follow along with a pattern.
| Term | What It Means |
|---|---|
| Inc | Increase (add one or more stitches) |
| Dec | Decrease (remove one or more stitches) |
| Join | Join two stitches together, usually done with a slip stitch in the top of the next stitch |
| Turn | Turn your work around so you can start the next row |
| Rep | Repeat (do it again) |
These terms will come up constantly as you work through patterns, so it helps to have them somewhere handy while you are just starting out.
Learning How to Read a Crochet Pattern
Now that you have the basic terms and abbreviations down, let’s talk about how to actually follow a crochet pattern from start to finish.
The first thing to understand is that different patterns are worked in different ways. When you are crocheting an afghan or a dishcloth, for example, you will usually work the pattern in rows, which means going back and forth across your piece to create a flat fabric. When you are making a hat or a basket, on the other hand, the pattern is typically worked in the round, which means you crochet in a continuous circle to create a tube shape with no seams.
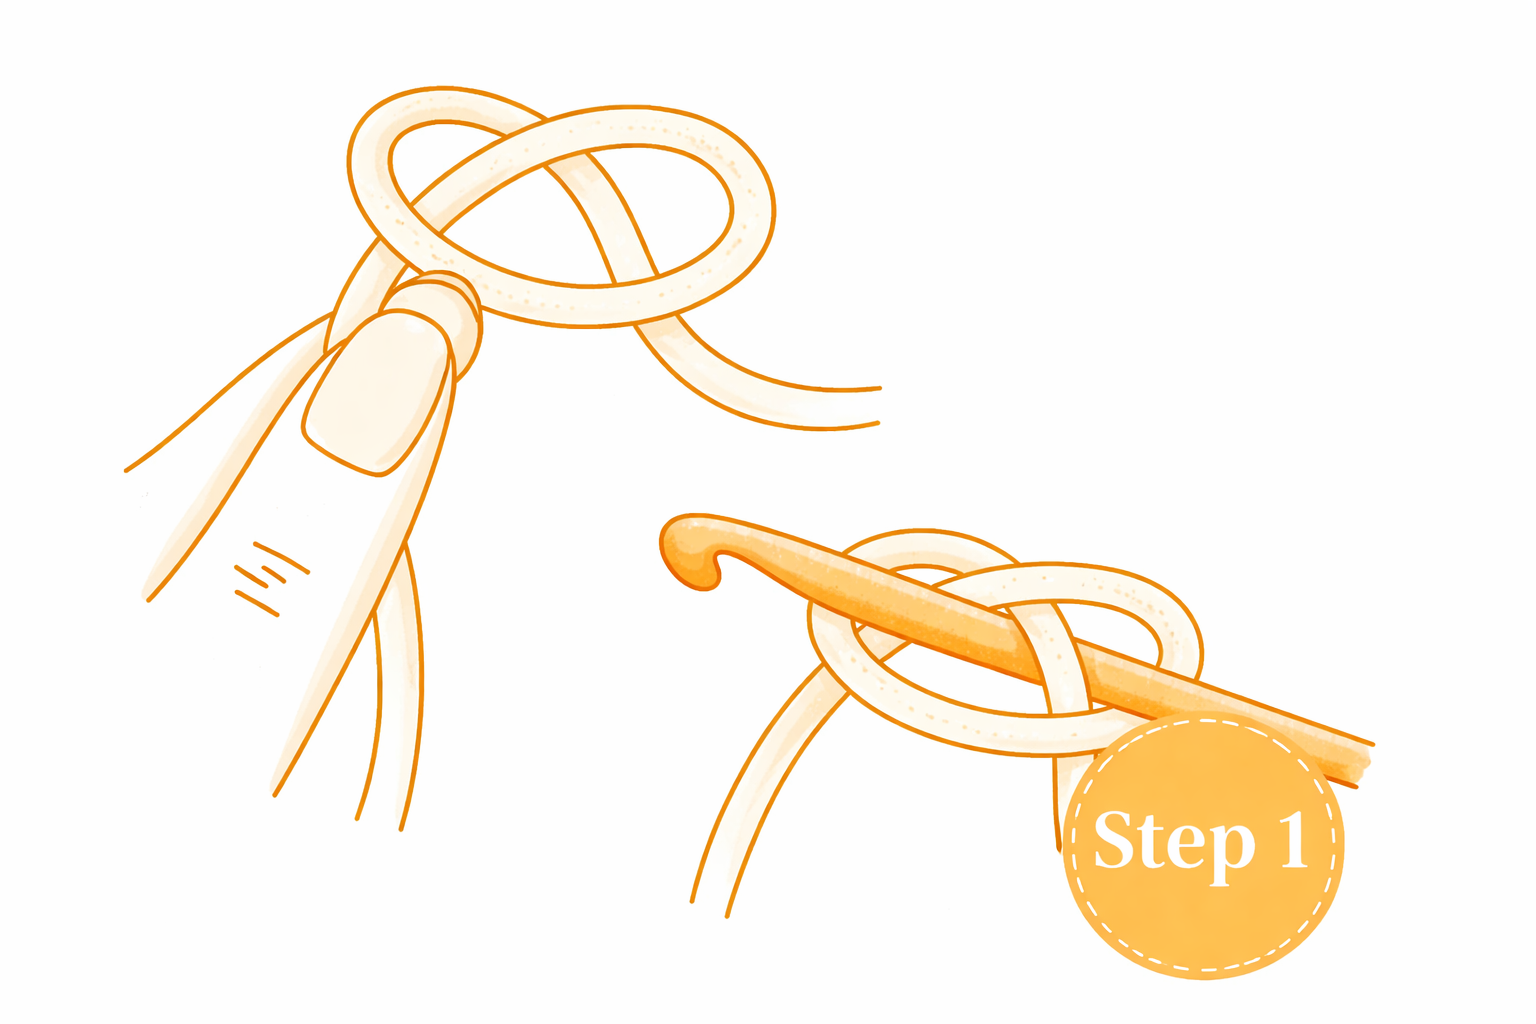
No matter what you are making, the very first step is always the same: make a slip knot on your crochet hook. You might notice that some patterns do not even mention this step. That is because it is considered so fundamental that most designers assume you already know to do it. Think of it like the instructions on a shampoo bottle that don’t tell you to wet your hair first. It is just understood.
Learning the Crochet Slip Knot
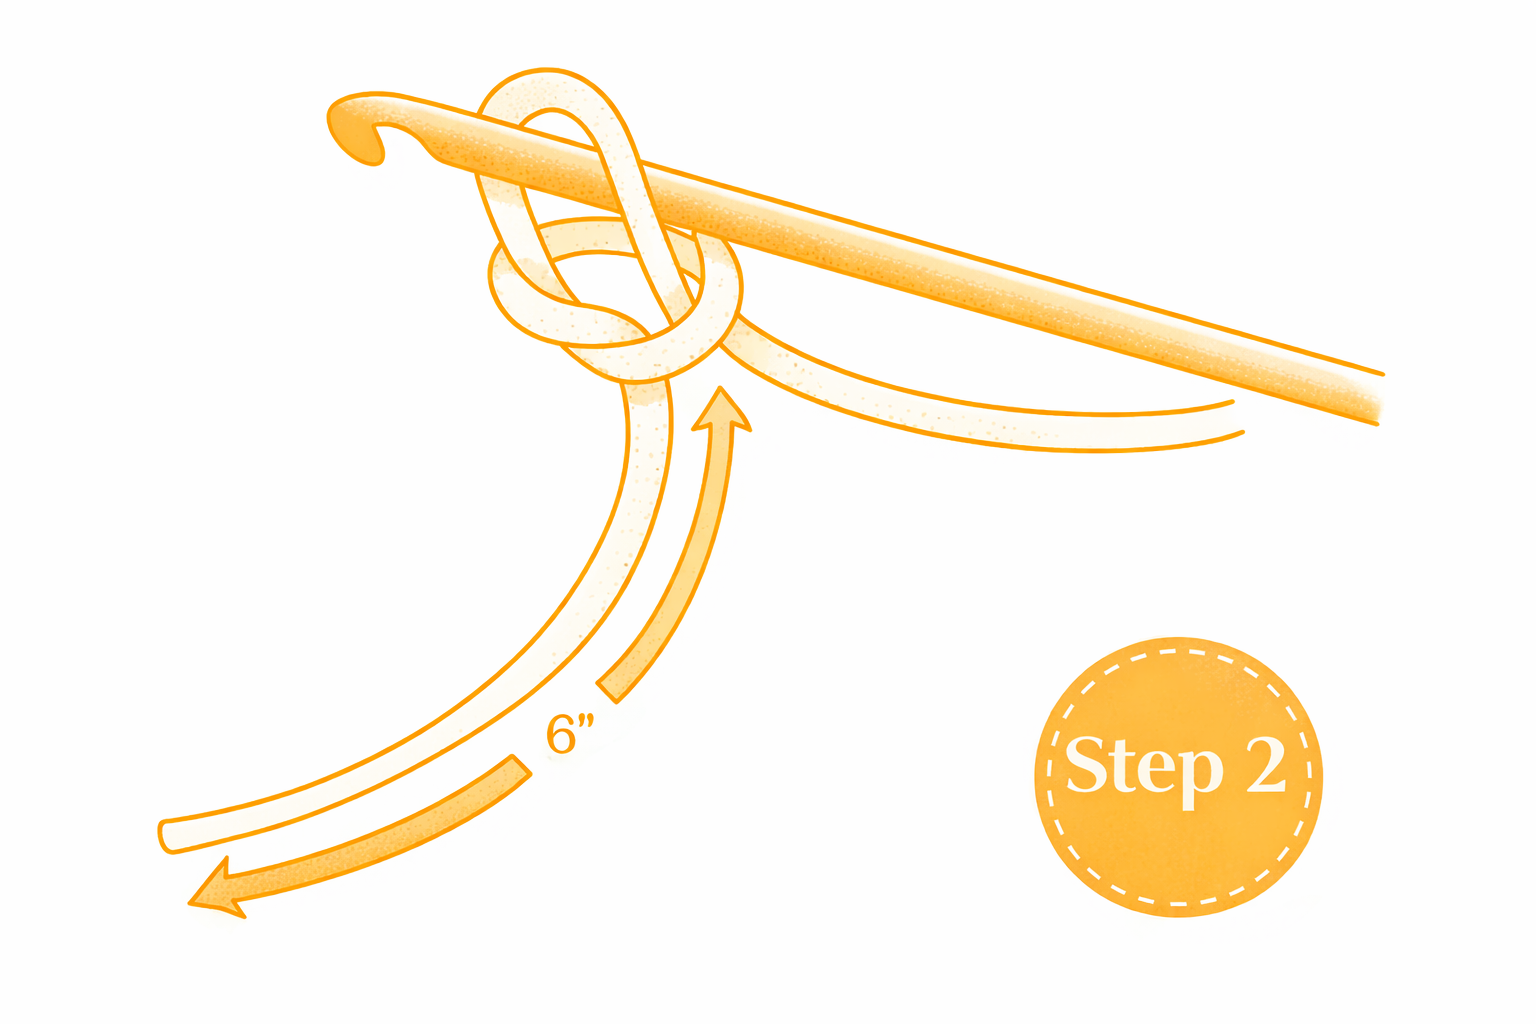
After you have your slip knot on your hook, you are ready to work the foundation chain. This is the row of chain stitches that forms the base of your project, and the pattern will tell you exactly how many chains to make.
Now, patterns can be written in a couple of different ways when it comes to the foundation chain. For example, you might see it written like this:
Row 1: Ch 15; sc in ch 2 from hook and in each ch across.
Or it might be laid out like this:
Ch 15. Row 1: Sc in 2nd ch from hook and in each ch across.
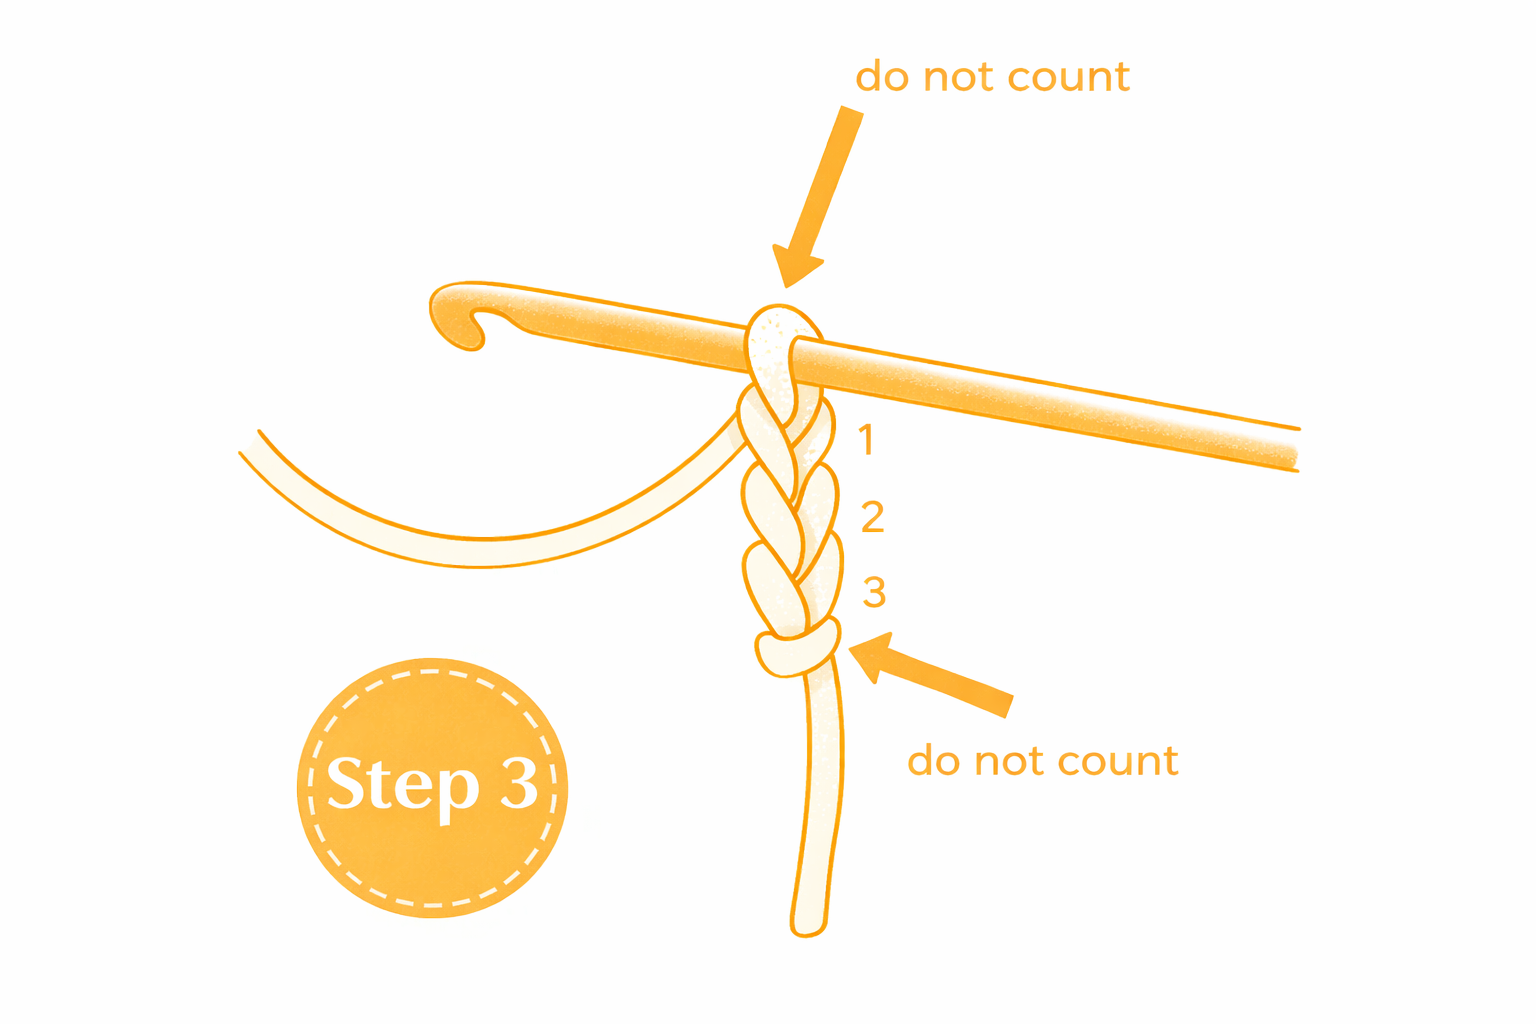
Both of those mean exactly the same thing. The writer is just choosing a slightly different format. What both lines are telling you is this: after making your slip knot, chain 15 stitches. Then count carefully and make sure you do not count the slip knot itself as one of those stitches. The slip knot is just the starting loop. It is there to give your work a place to begin, but it is not a stitch and should not be counted as one.
Once you have your 15 chain stitches, look back at the instructions. They tell you to “sc in 2nd ch from hook and in each ch across.” What that means is that you skip the very first chain closest to your hook and begin working your single crochet stitch in the second chain instead. You might wonder why you skip that first chain at all. Try working into it and you will quickly see why. It is simply too tight and does not give you enough room to work comfortably.
Crocheting Single Crochet
Moving forward, you will work a single crochet stitch into the second chain from the hook and then into each of the remaining 13 chains after that. The word “remaining” is often abbreviated in patterns as rem. When you are done with that first row, you will have 14 single crochet stitches total.
A good habit to build right from the beginning is counting your stitches at the end of every row. Most patterns will actually tell you the stitch count so you can double-check yourself. You might see it written in a few different ways:
- Sc 14
- 14 sc
- —- 14 sc
None of those are instructions to work more stitches. They are just the pattern’s way of confirming how many stitches you should have at that point. If your count does not match, that is your signal to go back and figure out where something went off track. Do not skip this step, especially when you are still learning. It will save you a lot of frustration later.
How to Turn the Work After Completing One Row
Once you finish your first row, you will usually see an instruction at the end that says “ch 1, turn.” This simply means you have completed a full row and it is now time to turn your piece over so you can begin working back across in the other direction for the next row.
You can turn your work to the right or to the left. There is no single correct way to do it. The important thing is that you always turn in the same direction throughout your entire project. Consistency is what keeps your tension and your edges neat. It helps to leave your hook in the work as you are turning rather than pulling it out.
Something worth noting is that some patterns do not include “ch 1, turn” at the end of the row. Instead, they might include it at the beginning of the following row. Either way, the effect is the same, so do not let that variation confuse you.
Row 2
When you move from row 1 to row 2, the pattern might be laid out in either of these ways:
Row 1: Sc in 2nd ch from hook and in rem ch; ch 1, turn. Row 2: Sc in each sc across.
Or:
Row 1: Sc in 2nd ch from hook and in each of the rem ch. Row 2: Ch 1, turn; sc in each sc across.
Again, both versions say the same thing, just formatted slightly differently. Row 2 is actually the easier of the two rows because you are doing the exact same motion as row 1, just without the foundation chain underneath you. Working into stitches instead of chains feels a little different at first, but you will get the hang of it quickly.
Row 3 and Beyond
As you keep going through row 3, row 4, and all the rows after that, there is one important rule to keep in mind: the turning chain 1 does not count as a stitch. You make it to bring your yarn up to the right height for the new row, but you do not work into it or count it in your stitch total. This is one of the places where beginners often add an extra stitch accidentally, so pay attention to it.
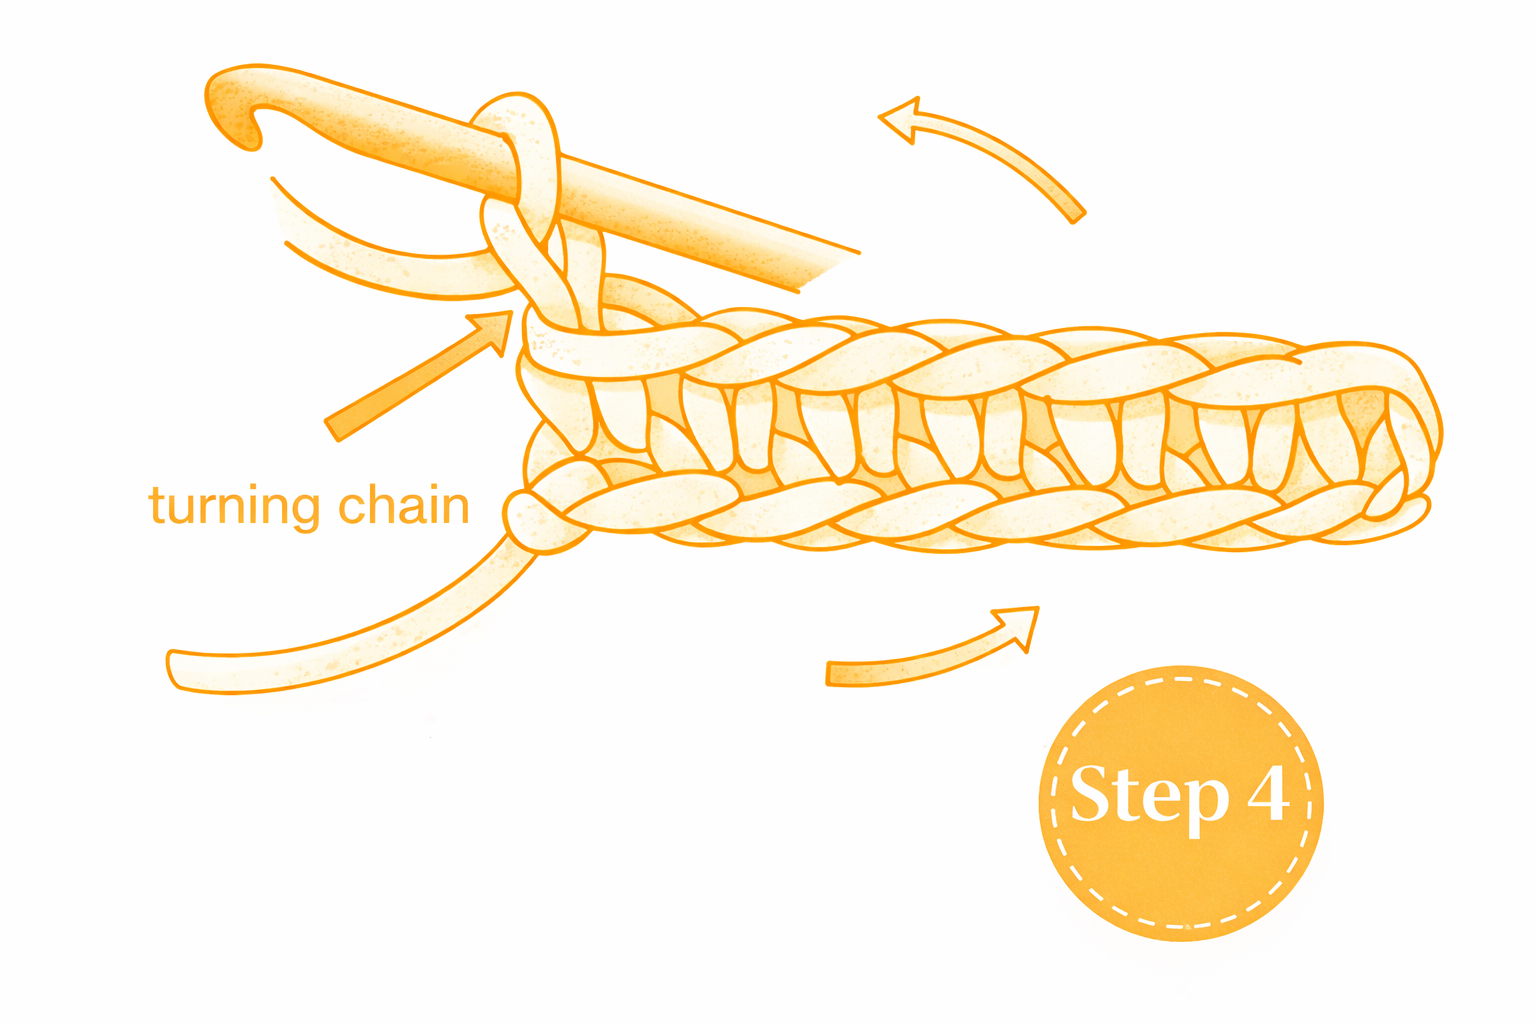
Working in Double Crochet
Things work a little differently when you are crocheting with double crochet stitches. Unlike single crochet, where the turning chain disappears and does not count, the turning chain in double crochet is actually counted as a stitch. This trips up a lot of beginners, so it is worth understanding clearly.
Here is what a first row of double crochet looks like in a pattern:
Ch 17.
Row 1: Dc in 4th ch from hook and in each ch across. (15 dc)
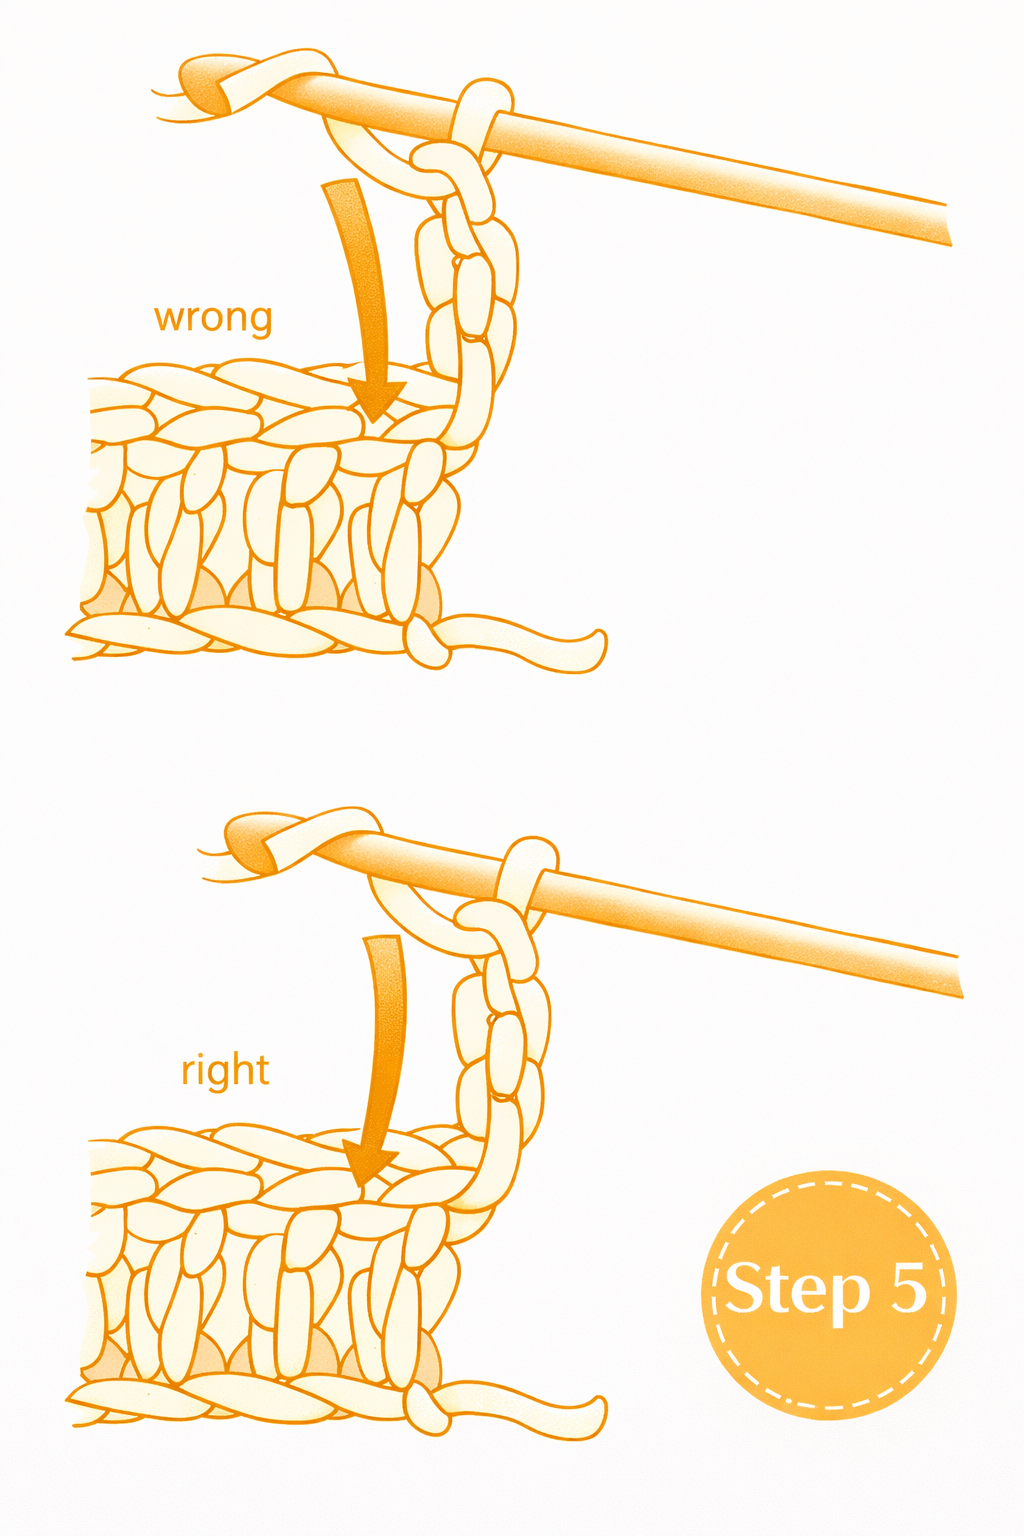
So you start with your slip knot, then chain 17. You skip the first three chains and work your first double crochet into the fourth chain from the hook. Those three skipped chains count as your first double crochet stitch of the row. When you work across the remaining chains, you end up with 15 double crochet stitches total, because those first 3 chains are stitch number 1.
How Many Turning Chains Do You Need?
After each row, your pattern will tell you how many chains to make in order to raise your yarn up to the right height for the next row. For single crochet, you chain 1 and it does not count as a stitch. For double crochet, you chain 3 and it does count as the first stitch of the new row. For half double crochet, it is typically 2 chains, and for treble crochet, it is 4.
This rule applies to all taller stitches unless your pattern specifically says otherwise. Whenever you see “ch 3, turn” in a double crochet pattern, remember that you are already one stitch into the new row before you have even picked up your hook to crochet.
Asterisks, Brackets, and Parentheses
Here is where crochet patterns really start to look like a secret code, but it is easier to decode than it seems. Crochet patterns are full of steps that repeat themselves over and over across a row or a round. Rather than write out the same instruction ten times, designers use symbols to indicate repetition. Once you understand what each symbol means, patterns become much faster and easier to read.
Asterisks ( * )
An asterisk is used to mark the beginning of a section that needs to be repeated. Here is an example:
Row 4: Dc in next 4 sts; *ch 1, skip the next st, dc in next st; rep from * to end.
Or you might see it written as:
Row 4: Dc in next 4 sts; ch 1, skip the next st, dc in next st, repeat from * to * across row.
Both lines mean exactly the same thing. You work the double crochet in the first 4 stitches, and then you keep repeating the section between the asterisks until you reach the end of the row.
Double Asterisks ( ** )
Sometimes you will see two asterisks together. This is a way of marking a secondary repeat within a larger pattern. The double asterisk signals that this particular chunk of instructions will not be worked the final time through the sequence. It can look confusing at first, but the best approach is to work your way through the instructions between the single asterisks and not worry too much about the double asterisk until you reach it. At that point, it is simply telling you to stop and move on.
Brackets [ ]
Brackets are used to show a group of stitches that need to be worked a specific number of times. The instructions are written inside the bracket, and the number of times you repeat them is written just outside it. For example:
Row 7: Dc in next 4 dc, ch 1, [sk next dc, shell in next dc] 4 times, ch 1, dc in next 4 dc.
This means you work the instructions inside the bracket four times before continuing with what comes after it.
Parentheses ( )
Parentheses are similar to brackets but are most often used to show a cluster of stitches that should all be worked into the same stitch. For example:
In next dc (2 dc, ch 3, 2 dc)
This tells you to work all of those stitches into a single double crochet stitch, which creates what is called a shell stitch.
Working in Spaces
Working in spaces is one of those instructions that leaves a lot of beginners scratching their heads. You might come across something like this in a pattern:
“Work a shell in the next ch sp.”
What that means is that when you made a chain over a skipped stitch in a previous row, you created a small gap or opening. Instead of working into a stitch, you are now going to insert your hook through that gap and work your stitches there. If there were multiple chains skipped, the gap is larger and is often referred to as a loop rather than a space. But the concept is the same: you are working underneath the chain, into the open space below it.
Working in the Round
Many crochet projects, especially hats, bags, and any kind of three-dimensional item, are worked in the round. Here is what that looks like in a pattern:
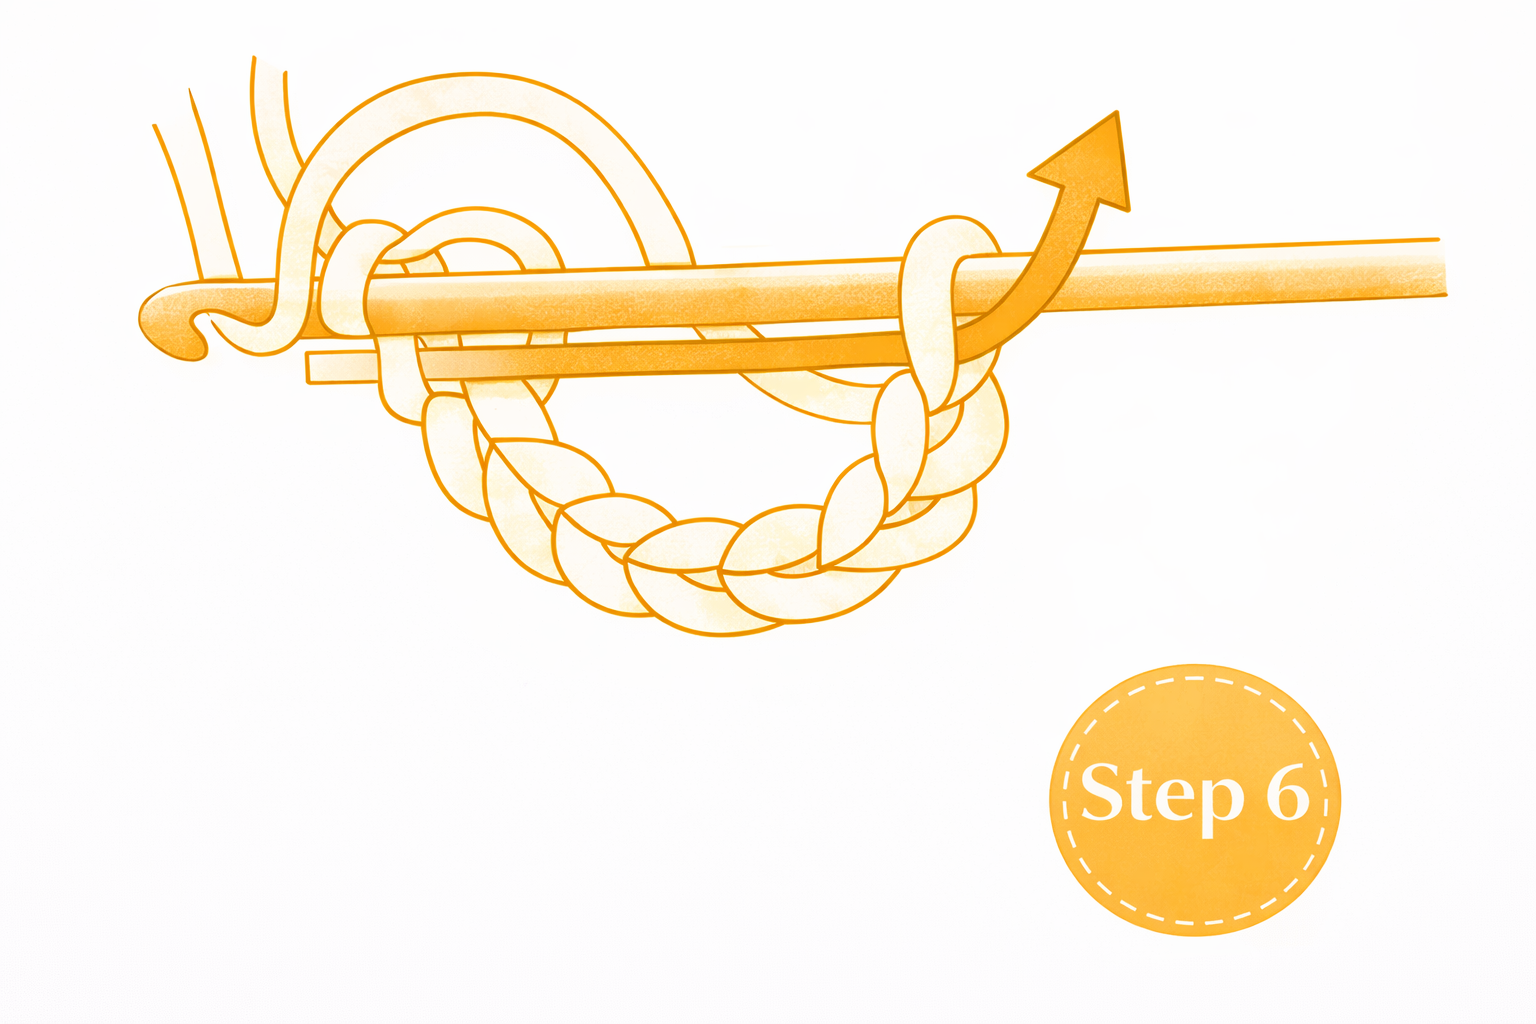
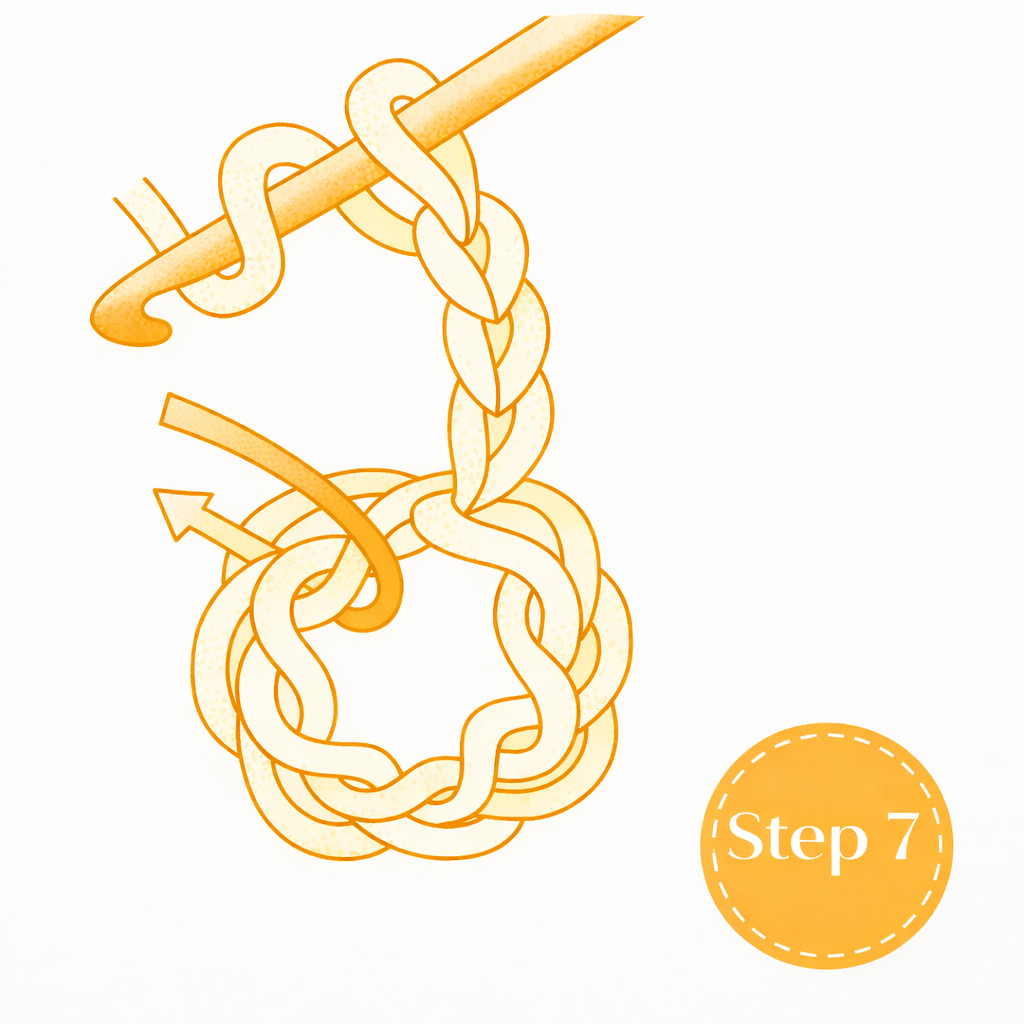
Ch 7, join with a slip stitch to form a ring.
To follow this instruction, you start with a slip knot and then chain 7. Then you insert your hook into the very first chain you made, hook your yarn, and pull it through both the chain and the loop on your hook. You now have a small circle, or ring, in the center of which you will work all of your stitches. The pattern will tell you exactly what to crochet into that ring. You will usually need to chain a few stitches first to bring your yarn up to the right working height.
If you are making something like a hat, a basket, or an amigurumi toy, you will likely start with a magic ring instead of a foundation chain. A magic ring is a neat little technique that lets you close the center hole tightly, which gives you a much tidier finish. Once you have your ring or circle set up, the pattern will guide you through each round from there.
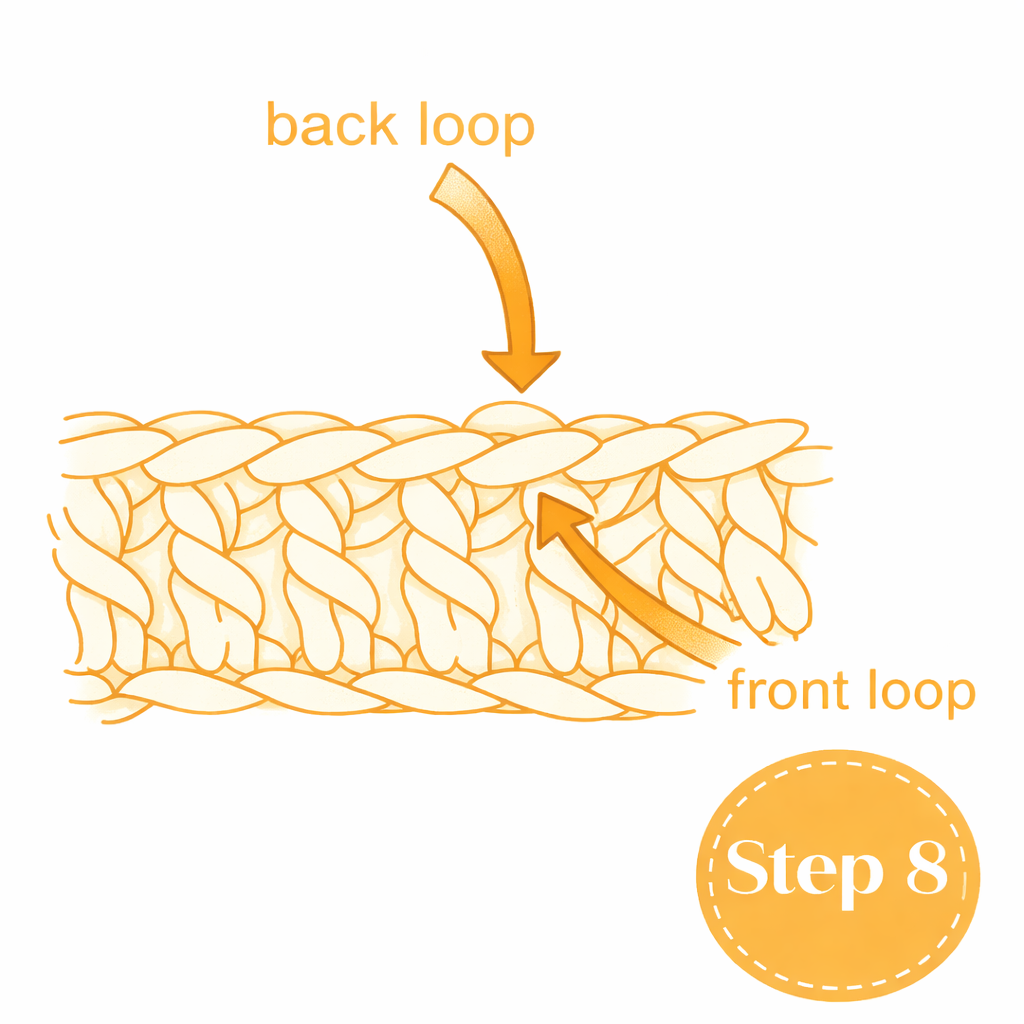
Front and Back Loops
Most crochet stitches are worked through two loops at the top of the stitch. But sometimes a pattern will tell you to work into only one of those loops. This creates a slightly different texture in your fabric, and it is a technique used in all kinds of patterns from ribbed edges to bags and baskets.
The loop closest to you as you work is called the front loop. The loop on the far side, away from you, is called the back loop. Your pattern will tell you when to use just one of them. For example, “sc in BLO” means to single crochet through the back loop only.
Working Garments
If you start making wearable crochet items like sweaters, cardigans, or tops, you will come across a whole set of terms that are specific to garment construction. Here are the most important ones explained clearly.
Right front, right shoulder, and right sleeve all refer to the right side of the body as if the garment is being worn. The corresponding terms apply to the left side in the same way.
Right side and wrong side can be confusing at first. The right side is the outside of the garment, the side that faces out when you wear it. The wrong side is the inside, the side that sits against your body.
Left-hand corner refers to the corner of your work that is closest to your left hand. Patterns that tell you to join yarn at a specific corner use this kind of language to help you orient yourself.
At the same time is a phrase you will see in patterns that require you to work two things simultaneously, like shaping an armhole and a neckline at the same time. Read through the instructions carefully before you begin so you understand what is happening on both sides of your work at once.
Work same as right piece, reversing shaping is a phrase that tends to confuse beginners the most. It simply means that once you have made, say, the left front of a cardigan, you will make the right front the same way except that all your shaping is done on the opposite side. So if you decreased at the beginning of a row for the left side, you will decrease at the end of a row for the right side.
You’ve Got This
Crocheting really is one of the most satisfying crafts once you start getting comfortable with it. The hardest part for most people is not the crocheting itself. It is learning to read the instructions. But as you can see, once you break it all down, there is a clear logic to how patterns are written. The abbreviations make sense, the symbols have purposes, and every instruction is there to help you create something beautiful.
The best advice anyone can give you is to read the entire pattern before you pick up your hook. Even just skimming through it will help you spot any techniques you are not sure about before you are deep in the middle of your project. Count your stitches regularly. Double check your gauge if you are making anything that needs to fit. And most importantly, do not get discouraged if something takes a few tries to understand.
Every experienced crocheter was once exactly where you are right now, staring at a pattern and wondering what on earth it meant. Now they can read one in a few minutes. With a little practice, you will be right there too. Happy crocheting!